
Anh Diep took the following photos of his AST elimination:
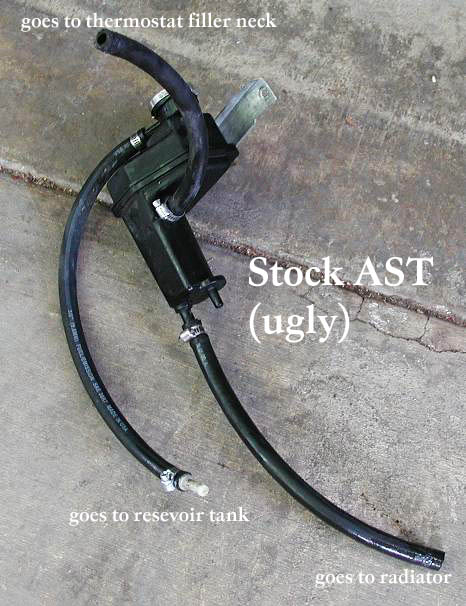
Stock AST :
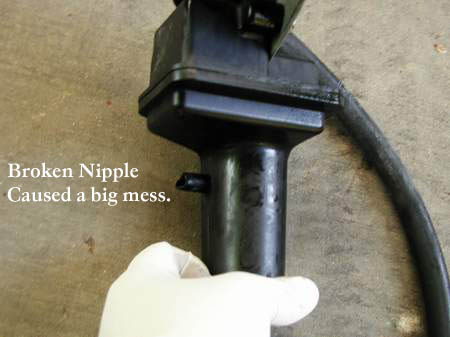
Tank after bursting (broken nipple):
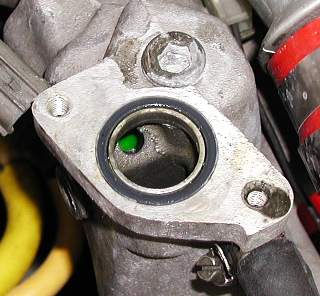
O-ring on neck:
New neck and cap:
New thermostat:
New and old thermostats:
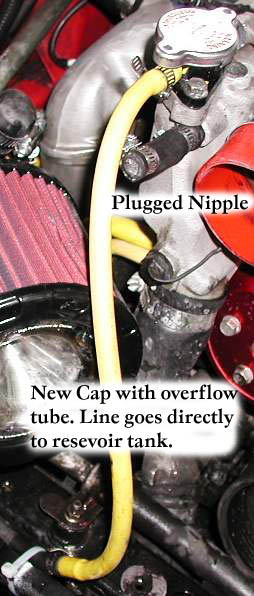
Plugged nipple:
_________________
Date: Thu, 06 Aug 1998 11:03:26 -0500
From: Jonathan Drewes (drewesj@email.uah.edu)
WARNING:
I just got off the phone with Cameron at Pettit. I was telling him that
I removed my air separation tank. I got this idea from the list (http://www.scuderiaciriani.com/rx7/) where people say it's fine to remove it and that there are no adverse affects to cooling. Cameron says this is wrong!! He has seen engine damage beacause the air separation tank was removed. The extremely hot bubbles cause localized overheating!!!!! Thus, I am putting mine back on.
_________________ Other people posted on this, saying they didn't agree that this was bad. --Steve
_________________
Date: Thu, 6 Aug 1998 10:55:07 -0700
From: "Jim LaBreck (ECA)" (a-jimlab@microsoft.com)
I might add that Cameron would sell mighty few $200 aluminum air separation tanks if he DIDN'T say they were necessary...
_________________
Date: Thu, 6 Aug 1998 21:35:28 EDT
From: KAWalanski@aol.com
I occasionally get into a compulsive rut which is difficult to shake while my old brain struggles to understand something without my conscious intervention. It has happened again this time with the Air Separator tank on my '93. Since buying my car last year, I cannot quiet this little voice in my mind which keeps asking what the air separator tank's purpose is, why it is needed, and how it functions, and it it has anything to do with the significant number of engine failures apparently due to overheating. I have assumed that Mazda needed this additional piece of plumping in the cooling system, otherwise it would not be there. Here are some questions, thoughts, findings and perhaps even conclusions which I've reached, so far, and the results of some experimenting.
1. The system seems to be designed to eliminate tiny bubbles from the coolant, not to bleed the system of air. I've taken a look at the coolant at the top of the air separator tank and found it cloudy. I took a sample of the cloudy coolant and it became clear, like typical anitfreeze, after a week of sitting.
2. The presence of these tiny bubbles in the cooling system will significantly reduce the heat transfer efficiency of the coolant. Mazda engineers must have recognized this during the 3rd gens development and added the air separator tank to eliminate (reduce?) the problem. I have never seen an air separator tank on any other car. Has anyone else? Does anyone know of any other car which has an air separator tank?
3. So, where do these tiny bubbles come from? The only place I can figure is that it is the gas (essentially atmospheric gases) dissolved in the water and/or coolant when the cooling system is freshly replaced. The concentration of gas in a liquid is inversely proportional to temperature, so the higher the temp, the smaller the amount of gas which can be dissolved in the liquid, in this case the coolant/water mixture. But once these gases are removed from the coolant, the air separator tank would serve no useful purpose until the next time the coolant is changed and the dissolved gases again needed to be eliminated. Or, is there some other source of gas?
_________________
Date: Wed, 10 Dec 1997 20:56:57 -0500
From: Rob Robinette (robinett@postoffice.dca.net)
Here's how to remove the small black coolant "air separation tank" that's bolted to your 3rd gen's intercooler. First, why would you want to eliminate the air separation tank? Well, it has a tendency to explode and dump all your coolant at inopportune times, it blocks some airflow through the intercooler and eliminating it frees up some space in the engine compartment. Many people on the list have done this with no apparent cooling system problems.
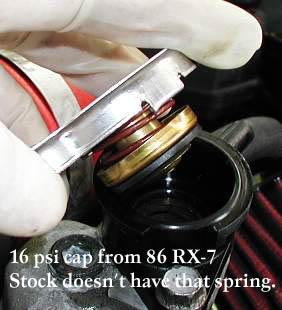
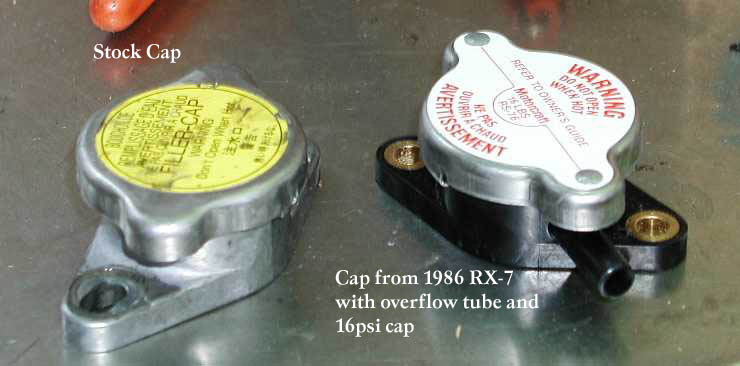
You will need two things to eliminate the tank. First one is the 1986 RX-7 "Radiator Cap Neck" with the overflow tube, part # 15-17YA-N326, $30.20 from Mazdatrix (don't be confused by the name, the radiator cap neck doesn't attach to the radiator, it's the radiator cap located on the engine). You will also need a 3/8" hose coupler and two hose clamps. Home Depot and Pep Boys sells a 3/8" "Camel" Hose Repair Kit ($4). It's in the tool area with the air tool accessories. The part # on the front of the package is 52-465, the number on the back of the package is 657465 A.
The radiator cap neck swap is easy but be careful not to drop the round rubber o ring that will probably come up with the old neck. I dropped it down onto the engine compartment floor pan. I had to pull it loose to find the o ring (I was going to pull the pan anyway to take the plastic air restrictors in the nose air inlet out).
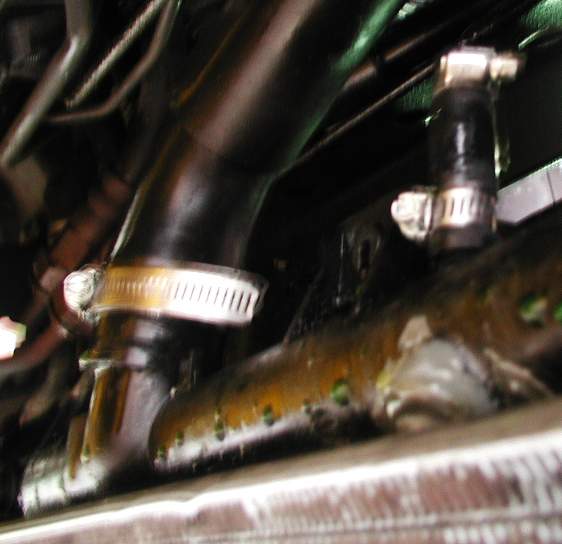
The next step is to join the hose that goes into the bottom of the air separator tank with the one that goes into the middle of the tank. The hose from the bottom of the tank will not have to run below the intercooler anymore so it's best to route it so that it comes up from the bottom of the engine directly below the radiator cap neck that you just swapped out. Bring this bottom hose directly up to the hose that was connected to the middle of the tank and couple them together using the 3/8" brass coupler that came in the hose repair kit. Don't forget to put the hose clamps on before you join the hoses.
The last step is to connect the air separator tank's overflow tube to the tube on the new radiator cap neck. This hose goes to the coolant overflow tank (in front of the right front wheel well). Just run the hose where you want it and cut it to fit. I lost about 1/2 a quart of coolant when I did this mod. I placed a medium sized bowl where the stock air box used to be to catch the fluid. Be sure to top off the coolant when you're finished. The mod isn't nearly as complicated as it sounds and there are a few pictures of the mod out there on someone's web site. Good luck.

________________
Rob now has this on his Web site.

Tom writes of how to do the replacement if you are just swapping it out. --Steve
Date: Thu, 4 Mar 1999 14:52:05 -0500
From: Tom Walsh (TWalsh@achieversusa.com)
I have done this... and it took me less than an hour to do it...
1) Remove the right front wheel.
2) Remove the liner that lines the wheel well. You don't need to remove all the little plastic screws, just the front half, and then bend the wheel well liner out of the way.
3)Remove the air box. I had the Pettit air intake so if you have the stock air box, it might take you a little longer.
4)Remove the bolt that hold the tank in place under the hood.
5)There is a black hose that leads to the air separation tank. This hose is broken into sections with a little white couplings connecting the pieces. Disconnect the one that is under the air box.
6)Remove the two bolts that hold the tank in place in the wheel well.
7)Remove the tank... It takes a little work moving it back and forth, but it does come out... If I remember correctly, you move it towards the driver side of the car and then pull towards the rear....
8)replace in reverse order.
9)Wash, rinse, and repeat if necessary.
10)Contents may have settled during shipping.
11)Objects in mirror are closer than they appear.
_________________
Date: Fri, 19 May 2000 22:26:58 -0500
From: "tom jelly" (jelkil@interaccess.com)
Get a gen 2 waterpump cap BASE for use w/ pressure relieving cap.
Run a hose directly to the overflow tank under the pass headlight. Put short, plugged hose lengths on the 3/8 hose BARBS left sticking out of the rad and waterpump header tank.
IF YOU HAVE THE 1 PC WATERPUMP THERMOSTAT HOUSING, YOU'LL NEED TO GET THE 2 PIECE UNIT TO DO THIS MOD.
Make sure you use a pressure relieving cap on the new thermostat housing, the one that used to be on the OEM ast.
__________________
Date: Fri, 26 Jan 2001 23:55:35 -0600
From: "Kris Pelley" (kpelley@mcneilhouse.com)
Subject: Re: (rx7) AST elim
Before you order, check your water pump housing to make sure the stock neck is bolted onto the housing. Some of the more recent remanufactured engines have water pump housings where the cap just screws directly on (I know, mine was that way). The simple fix is to find someone with an old style used housing for sale.
[Mail me] [To Lightning home] [To my home page] [Copyright Notice]