Oil Pan Removal
Also Motor Mount Removal

Last updated: July 20, 2000

From Spencer Hutchings:

Read this procedure completely before you buy any parts or attempt the procedure. This procedure covers only '93 RX7's. Not having performed the procedure on any other RX7's there will most likely be different steps but the basics should be the same. Reasonable mechanical skills and access to good tools are required for this repair. If you are not sure you can do this after reading over the procedure, get someone to do it for you. .......Proceed at your own risk.
Parts Required:

Where to look for the leak:

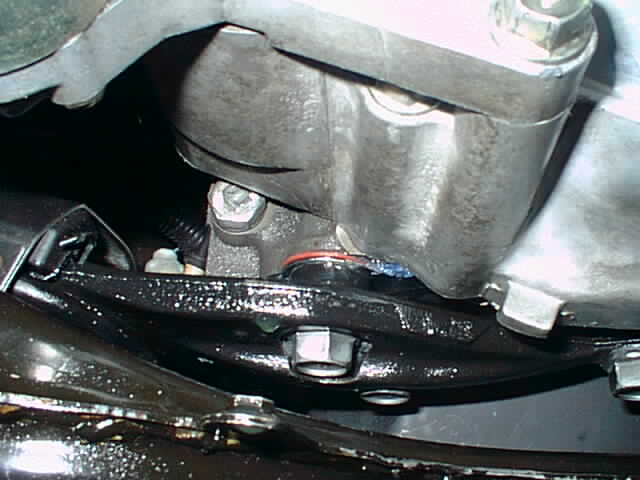
motor mount

This seems to be the most popular place for the pan to leak, LHS motor mount. I'm not sure why, but the motor mount bolts seem to work loose over time. I suspect that this is due to improper installation by your typical Mazduh mechanic. I tried to remove, clean, and re-torque the mount bolts to no avail. The leak just got worse. See the drop of oil? Mine got so bad I could watch it drip.

Make sure the bottom of the motor is spotless when you look for any leak. Girlie men can use Simple Green and Manly men that don't mind choking on the fumes should use Castrol Super Clean.
Procedure:

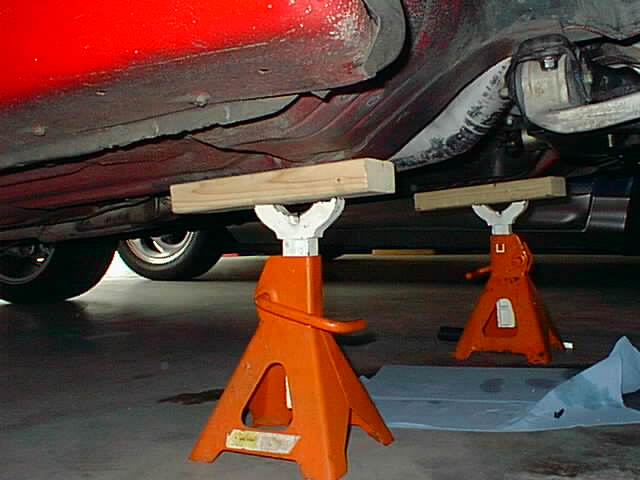
  1. Jack up the car You must place the jack stands where they won't be in the way if you end up dropping the sub frame. I used some 2x4 lumber to avoid denting up the bottom of my car.

    Jack stands

  2. Drain the oil.

  3. Remove the front plastic under tray.

  4. Remove the aluminum transmission pan.

  5. Remove the 2 14 MM nuts holding the motor mounts to the sub frame.

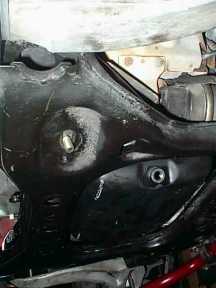
    Motor mount

    This is a picture from the passenger side of the car showing where the he RHS Motor Mount attaches to the sub frame. I have already removed the nut from the bottom of the mount and drained the oil.
  6. Remove the boost hoses going to the intercooler. Stuff some rags into the openings so your wife's cat doesn't try to sleep in them.

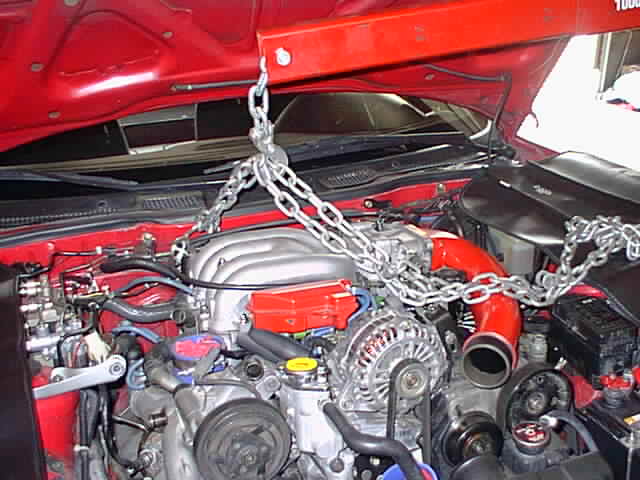
  7. Raise up the motor with a hoist until the transmission contacts the tunnel.

    The engine on the hoist

  8. Remove the six bolts securing the motor mounts and set them to the side.

    The motor mounts in this car are filled with oil and should be closely inspected for damage. Now would be a good time to replace the motor mounts if they are leaking.
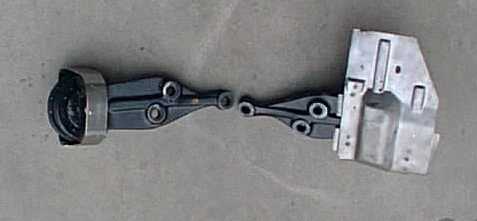
    Motor mounts

  9. This is where it gets tricky. You should be able to get all the oil pan bolts out fairly easily. But you may find that the pan itself will not fit through the opening in between the sub frame and the motor/transmission.

    If you can't get it through the opening you will have to unbolt the power steering and drop the sub frame. The power steering is only four bolts and then just push it out of the way.

    The sub frame is four nuts and two bolts. These were on really tight on my car. It took a 4' steel pipe to break them loose. I broke 1 extension, 1 adapter, and 2 sockets, and 1 socket wrench breaking the torque loose. I must point out that all of the above broken tools were Craftsmen.

    Once the PS and sub frame are out of the way the pan should come right out.

  10. Clean and dry the pan very carefully. Get all the old gasket and silicone off. I used a bench grinder with a steel brush wheel to get all the silicone off.

    Make sure the pan is stright. A little persuasion with a soft mallett may be required. If you are not sure it will seal you may as well replace it.
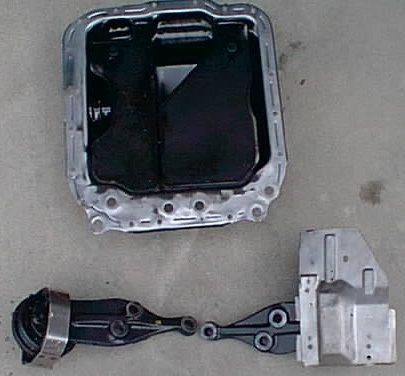
    Pan and motor mounts

  11. Lay a 1/4 inch wide bead around the entire pan and each bolt hole with the Ultra-Black silicone.

  12. Move the pan into position and finger tighten all the 10MM bolts. These only need about 6ft-lbs of torque, that is not much so be careful! Torque all the nuts in as close to a star pattern as you can get.

  13. Put the motor mounts back and torque them down as well.

  14. Now put all the rest of that stuff back on and let the car sit for at least 24 hours.

  15. Do not attempt to fill it back up with oil yet!

  16. After the 24-Hours is up fill it up with dino juice and check for leaks.

If it still leaks you may have a really warped pan or you may have not gotten Ultra-Black in all the places you should have.

Go get the car aligned as soon as possible. (If you had to drop the sub frame.)

________________

Date: Fri, 17 Sep 1999 16:40:21 -0500
From: "Westbrook, Chuck E." (CWestbrook@tmh.tmc.edu)

There are several theories about the newest and best way to seal a pan with and without using a gasket. The problem is that the oil pan gasket is stiff and hard. Therefore it can't conform to any irregularities nor will it help to retighten the bolts. When using any sealant with a gasket, both sides have to be covered. That means you have twice the chance of having a leak than if you use no gasket at all because you have twice the surface area. So I decided to not use a gasket.

In short; I cleaned the pan and engine block sealing surfaces several times with lacquer thinner, placed a heavy bead of Permatex ULTRA BLUE on the pan sealing surface and around the bolt holes, and bolted it up without a gasket. To help the 10mm bolts more evenly spread their holding force and to also help prevent warping the pan edge, small flat washers were also used. Results, no oil leaks. Following is my ordeal in doing this project by myself, and with the help of Rick Sheveland's garage and engine lift.

There were several postings, and some RX7 sites detail how to due this project without dropping the subframe. That method was tried with no results on my March 1992 build R1. Still had to drop the subframe. If I had approached it this way from the beginning, it would have been quicker and easier; contrary to what some others have said. It all depends on how hard it is to remove the 4 nuts and 2 bolts that secure the subframe. Maybe you should try breaking them loose ASAP before going to far into the process if you don't think you are up to the task.

I used a 1/2" drive torque wrench and did not break any extensions or sockets. Of course afterwards the suspension has to be re-aligned. The 1993 Mazda RX7 Workshop Manual page D-10 was used as a guide with some improvements.

  1. Apply parking break and chock the rear wheels. Jack up the car enough to drain the engine oil. Use safety stands. Oil draining will take a while if you really want 99% of the oil drained. It's cleaner this way. In fact it is easier if you start this process one day with a warm/hot engine (helps oil to drain faster and more complete) and finish up the next day. Really is a 2+ day process with a hot engine if you prefer a higher level of comfort. Day 1: drain oil and prepare for pan removal. Day 2: dismantle and reassemble. Day 3: add oil and drive away.

  2. Remove plastic engine undertray and aluminum transmission undertray. Both are held on with 10mm head bolts and two plastic snap-in anchors. Also disconnect the oil low level sensor connector and free up the wire.

  3. Remove the four 14mm rack and pinion bolts. Two of them are reached up through holes in the bottom of the subframe. Remove the four 12mm front sway bar bushings bolts. Let the bar hang from the end links.

  4. This step can be bypassed and done later if the subframe doesn't drop enough. Remove: front wheels; spring clips that hold brake lines to the shocks and free the lines up from the shocks; and the six 14mm nuts that hold the shock assembles to the towers. It's advisable to support each front A arm with a jack then lower it slowly after it's three nuts are remove. This way you can check for any line tension.

  5. After draining the oil, jack up front of car high enough to get under with ease and place safety stands under side frames. I used 3 foot lengths of 2X4s between the stands and frame to spread the load. You will have to be able to get under the dropped subframe to work on the pan. Attach the engine lift or restraining bar to the engine's front hanger. Take out any slack and place under low tension.

  6. Remove the two 14mm engine mount nuts. If the engine lift has too much tension, it will be noticeable. The nuts will still be tight against the subassembly as you remove them. If so, reduce tension because you don't want the engine to move vertically very much.

  7. Apply a lubricant like WD-40 to the four studs that hold the subframe. Using a 6 point 17mm 1/2" drive deep well socket, extension, and breaker-bar/torque wrench; loosen the subassembly four nuts and two bolts. Remove all 6 and you should be able to pull the subframe down giving easy access to the pan and the turbo-control actuator.

  8. Remove the six 17mm engine mount bolts. Remove the turbo-control actuator with a 10mm wrench and 12mm socket. Using a 10mm socket and extension, remove the pan bolts. Have a large thick old rag or drip pan ready and under the engine. Slowly pry around the edges of the pan with a thin strong putty knife or similar tool to loosen the pan. Remove it. You do have to move it around some to clear the oil pickup.

  9. The bottom of the engine will continue to drip oil for some time. That's what the rag or pan are needed for. This is a good time to thoroughly clean the pan of all oil and any gasket residue. Clean and dry all removed nuts and bolts. Be sure all threads are cleaned of any old sealant. This is were a few metric bolt threading dies come in handy, or use a steel brush. I even used a very small flat screw driver to clean any sealant that was in any of the pan attaching threaded holes and same for the engine mount holes. It is worth your time to take one 10mm bolt and screw it into and out of each hole to verify that are cleaned and the threads are true. The same can be done to each bolt with a nut when cleaning them. This way you will not have any surprises when reinstalling the pan with sealer on it which is drying up. Would you want to have to clean it all again just because one bolt had a problem getting started?

  10. Wipe/pat the entire engine bottom of dripping oil. It's best to insure that no oil is still dripping when reinstalling the pan. Any oil on any surface will compromise the seal. Even clean out the bolt oils with cotton swabs or something similar. When all oil drips are stopped, completely clean the surface of the engine that mates with the oil pan. I used lacquer thinner because I already had it and it will clean up/dissolve almost anything not metal. Also clean the oil pan sealing surface. Clean both several times.

  11. It's time to start reassembly. Get your tools set out in some easy and fast to reach order. Also organize your 10mm pan bolts with or without the extra flat washers, and the six engine mount bolts. If using a gasket, then you will have to lay down two sets of sealant. Using the Permatex Ultra Blue or what ever you use, place nice 1/8" to 1/4" beads down the center of the mating surfaces of the pan/gasket; and around each bolt hole. Reinstall the pan, you will have to wiggle it around the oil pickup. Install all the 10mm bolts first and hand tighten them. Torque them in a cris/cross pattern to the range of 79-104 inch pounds. Clean any sealant that has entered the six engine mount holes. Attach the two engine mounts with the six 17mm bolts and torque them to 55-68 foot pounds. Reattach the oil level connector, and the turbo-control actuator.Don't forget the "C" clip. Do not fill the pan with oil for at least 24 hours if at all possible. This gives the sealant ample time to cure.

  12. Align the subframe with the engine mounts and attach with the two 14mm nuts but only screw them on about 1/4". Align the subframe with the mainframe and start the four 17mm nuts and two 17mm bolts. It might be easier using a rolling jack to lift the subframe up to do these attachments. After all are connected, hand tighten and then torque the 17mm nuts/bolts to 72-87 foot pounds. Torque the 14mm engine mount nuts to 55-68 foot pounds.

  13. If step 4 was done: Raise up the shock/spring assemble and attach with the six 14mm nuts. Torque them to 34-46 foot pounds. Reattach brake lines to the shocks with the spring clips. Place wheels back on and torque to 80 foot pounds.

  14. Attach the rack & pinion assembly with it's four 14mm bolts torqued to 28-38 foot pounds. Attach the sway bar with the four 12mm bolts and torque to 14-19 foot pounds. Reinstall the engine and trans undertrays with the 10 mm bolts, etc.

  15. Wait one day for the pan sealant to cure, then fill up with oil and drive away.

You did replace the pan drain plug, didn't you?

________________

Date: Sun, 01 Feb 1998 16:03:14 -0800
From: NetBlazer (netb@WhyWeb.com)

> How hard was it to remove the sub-frame?
> Remove the strut tower bar 2x14mm
> Jack up the front of the car.
> Put jack stands anyplace but on the subframe. I used some 10" long 2x4's
> on top of the stands to spread out the load out behind the fire wall.
> Pull both the front wheels - 10x21mm nuts
> Pull plastic under tray - about 12x10mm bolts
> Pull sway bar - 4x12mm bolts 2x14mm nuts
> Unbolt power steering rack - 4x14mm bolts
> Attach a hoist to the motor and take up the slack - hoist, chain,
> u-bolts
> Disconnect the motor mounts from the sub frame - 2x14mm
> Drop the sub frame down - 4x17mm bolts and 2x17mm nuts.
> This does not remove the sub-frame, it only loosens it enough to pull it
> out of the way while you get the pan in and out. In order to remove it
> completely you would need to disconnect the front lower ball joints, and
> the lower strut nut. I think.

This is false. I have completly removed an oil pan, replaced the gasket, and re-installed it with no leaks to date (my dads car) and never loosened the subframe in any way.

Ignore the shop manual on this as it is designed to burn as much time as possible. I firmly believe I could pull the whole engine, change the pan, and reinstall the engine for the amount of time they have into doing the oil pan their way.

Anyway, simply remove the strut tower brace, unhook the oil lines, unbolt the motor mounts at the subframe (two nuts) and lift the engine up until the tranny just touches the top of the tranny tunnel. Unbolt the motor mounts from the engine, now using a 1/4" drive universal, a 1/4" drive 10mm socket and a 1/4" drive extension and socket wrench unbolt all the 10mm bolts which go around the pan.

Use some sort of mortar spatuala or paint scraper, and carefully run it around between the pan and engine to seperate it without causing it to warp (most pan warpage is from people trying to pry it off). Lower the pan, and work it around until you can get the baffle clear of the oil pickup. Given the correct angle, the pan will slide out from under there.

This procedure is also valid for changing the front cover gasket, with a few additional steps.

_______________

From: Westbrook, Chuck E. (CWestbrook@tmh.tmc.edu)
Date: Wed Jun 28 2000 - 09:03:16 EDT

Rick Sheveland and I do not use gaskets on the engines that we work on. A gasket gives twice the area that can leak. We extremely clean the pan and block mating areas and insure that the pan is not warped or bent where it contacts the block. Then we use ULTA BLUE Silicone sealant to seal it. Place about a 1/8" bead down the middle of the side and front pan surfaces and around each bolt hole. For the rear you go around each bolt hole and where it mates to the block. Let it set for 24 hours before filling up with oil. We haven't had any leaks since using this method.

_______________

Date: Thu, 20 Jul 2000 13:00:26 EDT
From: "Firas Arabo" (firas_arabo@hotmail.com)
Subject: Re: (rx7) (3) oil drain plug spec?

>I need to replace my oil pan drain plug...anyone know the size
>and thread specs?

14x1.50

_______________

Date: Mon, 11 Oct 1999 15:13:45 PDT
From: "Firas Arabo" (firas_arabo@hotmail.com)

I just did the motor mounts over the weekend, and this is what was involved. I have a 9/93 build date, with 89362 miles.

Parts:

The new driver's side mount was definitely different in design. The rubber mount looked like it had been turned upside down when compared to the old mount. Certain areas were thickened on the rubber mount. The metal bracket that surrounds the mount was almost twice as thick as the old one. The front-facing side of this metal bracket was wider by about 1.5 times. And the mount arm was shaped differently were it slides under the rubber mount.

The right side looked identical to the old one. It didn't come with the heat shield, so I had to remove the 3 10mm that held it to the old mount.

3/8" wratchet, short 17mm socket, 14mm and 10mm. (can be short), ultra black silicone.

Labor:

  1. I removed the upper and lower intercooler pipes. I set the car up on jack stands.

  2. Removed the 2 14mm nuts holding the motor mount studs to the sub-frame. Remove the four 10mm bolts holding the splash shield underneath the tranny.

  3. To lift the motor assembly, I placed my jack underneath a flat spot located on the bellhousing where it mates with the motor. If you look just behind where they meet, you'll see it. I lifted the motor until I saw the studs clear, which was about 1.5 inches.

  4. All six 17mm bolts were on real good. I have heard of others mention how these bolts are shared with the oil pan bolts, and to be careful not to overtighten the bolts. But I gotta tell you, these bolts were on real good, nowhere near the wimpy tightness of 79-104 in/lbs required for the oil pan bolts. It would be nice to use a 1/2" wratchet, but it was too thick to fit in between the mount arm and the sub-frame, so I used 3/8" instead, which made the bolts a bit harder to remove. By the time I had installed both new mounts, I was 1.5 hours into it including setup.

  5. And now the hard part I didn't expect...

    Once I got the the mounts on, I could clearly see that the stud for the driver's side mount was not going to clear the sub-frame opening. It was too far over to the driver's side and forward, by about the thickness of the stud itself. From this point on, I spent about 1.5 hours scratching my head, trying to force the assembly over to the passenger's side, but no luck.

    Finally, I lifted the motor back up, removed the driver's side mount, then fit its stud into the sub-frame, slid some 2x4's under the passenger side mount, then slowly lowered the motor assembly in an attempt to get the motor to rotate down towards the driver's side so that the bolts had a straight path into the mount arm. Well, it worked. I was able to get the bolts on with the stud already in place on the sub-frame. The bad part was that after rotating the assembly by a small amount, it was a small enough difference to keep me from fitting my torque wrench onto the bolts for the driver's side. I torqued the passenger side bolts to 62 ft/lbs, book specifies 55-68 ft/lbs, and at no time did it feel like the threads would break loose. I'll have to keep a close eye on the driver's side mount bolts in the future.

  6. The factory used a healthy amount of sealant on all six bolts, since they reach right into an open oil passage. A local shop had installed mounts on a [3] about a year ago and didn't use anything on the bolts, only to find that it leaked oil heavily. I ended up applying some Ultra Black Silicone to the threads, and a little into the passage as well.

The result, cold starts feel smoother, probably because my driver's side mount had completely separated off the arm ;-) The throttle seems to be a bit smoother too as you feather the accelerator. I also gained about 1/8" clearance in between my downpipe (N-Tech) and the sidewall.

[ Mail me ] [ To Lightning home page ] [ To my home page ] [ Copyright Notice ]