
From: "Christopher N. Keller" (ckeller@fived.c3i.saic.com)
Date: Thu, 24 Apr 1997 16:44:14 -0400 (EDT)
Hopefully, this can be the start of an official guide to endangering your life by replacing your steering wheel.
1) Disconnect negative battery cable from car battery. Beware if you have your radio's anti-theft code enabled.
2) Remove three bolts on the back of the steering wheel. I believe a 10mm socket will suffice. The bolts are generally covered by little rubber stoppers that can be easily pulled out. At this point, you may as well remove the "cowl" that goes both above and below the steering column. There are three phillips head screws on the bottom of the cowl that need to be removed. After this, the top part of the cowl should pop off, leaving the bottom part to fall free. Note that there is a little metal ring surrounding the ignition that always wanted to fall free. This is easily popped back into place when you are done.
3) Gently pull the airbag from the wheel. I never detonated mine, so I assume it's reasonably safe. The airbag will be connected to the wheel by a molex plug and a little elastic rubberband thingy. This molex plug was designed to be a pain in the ass. Study it for a few seconds before you rip it apart. I believe that once you losen the blue plug, you can slide the orange one off, then detach the blue one fully. Remember this, as you will see this plug again. Simply unplug the molex plug and unhook the rubberband thingy. Your airbag should now come free from the steering wheel. I believe that these go for around $300 or so on the "black market".
4) Directly in the center of the exposed steering wheel "innards" should be a nut in size large. Remove this. Gently tug on the wheel until if comes off. DO NOT HIT THE WHEEL WITH A MALLET! Mine didn't want to come off. If you look closely, you should see the clock ring exposed. The clock ring is a circular item that rotates within the clock ring setting. If you look carefully, you'll notice a tiny little hole slightly above the bolt that held the nut you just removed. I cut a large piece of coat hanger and jammed this into that little hole until a heard a 'click'. Strangely enough, the wheel popped right off after that. I'm not sure what possessed me to do this, but it worked nonetheless. Carefully slide the exposed molex plugs through the back of the steering wheel and remove the wheel.
5) At this point, you should the clock ring and clock ring holder. This entire thing must come off. Look at the left side of the clock ring holder, you should see a set of two(??) black wires coming into what looks like a non-detatchable black molex plug. Trace this wire back from the clock spring holder under the dash. Here again you'll find the blue/orange molex plug from hell. You'll need to detatch a few plugs: a ground, a white one, and the blue/orange monster. Head back to the clock spring and detatch that ground plug there by losening the screw that it is attatched to. The clock spring holder is held on by three small silver screws. Pull these screws out. At this point the entire clock spring assembly should pop off (once you untangle the wires). If not, than I missed something, but you get the idea.
6) At this point, I followed the instructions supplied by the Momo guys. This part went pretty quickly. It took me a few tries to the get the wheel centered correctly, but all in all, putting the new wheel correctly on was a piece of cake once the old stuff was off.
7) Note that I didn't mention how to hook the horn up. Mitch will be fab'ing some sort of 'Mitch thing' to get this to work.
8) Before you put all the dash stuff back together, there are two more things to do. First, take notice of the airbag light indicator to the left of the steering assembly. It is the third light from the left on the display panel. Get behind the dash and pull the third bulb from the left out. Otherwise, it will blink at you. Believe it or not, the dash kind of just pulls right out. Be gentle though. The workshop manual was a little help. The lights twist and slide out, no tools necessary.
9) On the gearbox tunnel, behind the radio/temperature controls there lies the SRS computer. Note that you can get to this from the drivers foot well. There are two white molex plugs that need to be detatched. The computer is a small black box with yellow caution stickers on it. By disconnecting these, you have stopped the "series of five beeps" sound that I just discovered.
At this point, you should simply have to put everything back together. I don't think I left anything out, but if I have, feel free to amend this and re-post it to the list. Once we get it perfect, someone can stick this in the modificatons FAQ.
The author would like to express his thanks to Nathan, as he was there providing moral support and install help at the wee hours of late last night.
_____________________
From: Steve Cirian
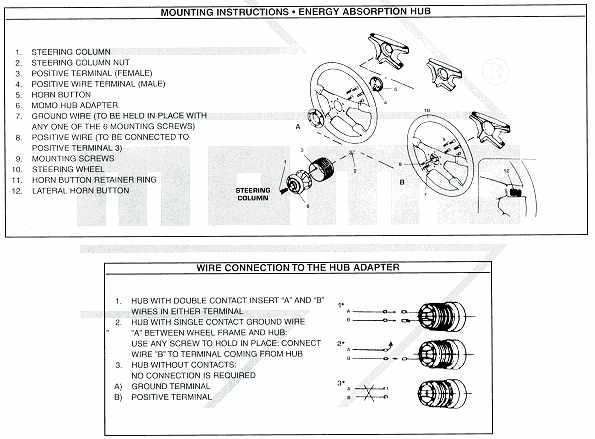
Pic of the Momo hub:

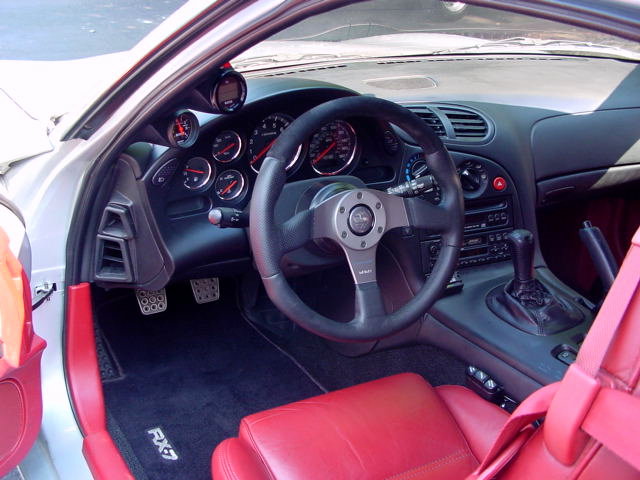
Date: Tue, 12 Feb 2002 11:13:52 -0800 (PST) I did this a while back and have some pics on my
website.
_______________
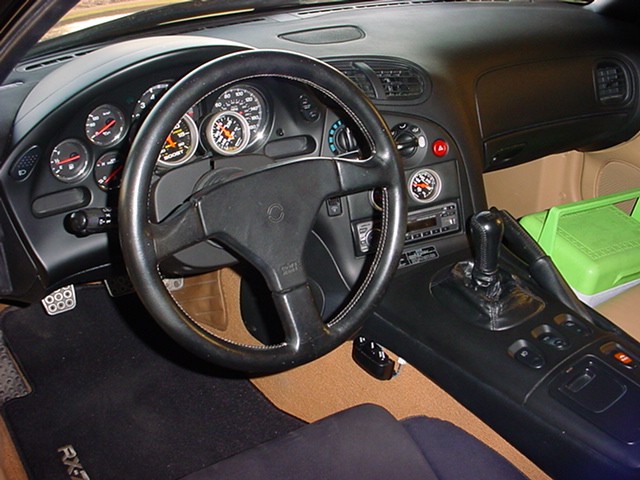
AL Beder sent in a picture of his relocated cruise control module. It is
mounted under the center console/transmission tunnel. --Ed.
From: (albeder@email.msn.com Here is the picture with the MOMO Cobra wheel. I just switched to the
Sparco Ring to get a little more leg clearance to make it easier to heel and
toe.
_______________
Another example of this, from Mike Smereka:
Date: Wed, 11 Mar 1998 07:40:05 -0500 Steve wrote in how to extinguish the air bag warning light. Since I seem to
always have much to do to the car a faster, but far less elegant method, is to
cut a small piece of black vinyl and cover the light.
_________________
Some people have suggested that black electrical tape might work also...
Like some people put on the VCR to fix the flashing 12:00 "problem". In
the C&D article, Eric said he tried this, but it didn't work due to the
reflection of the light on the rest of the gauge. --Steve
_________________
Date: Wed, 11 Mar 1998 20:24:37 -0000 For anyone wanting to remove the standard wheel due to fitment of an
aftermarket wheel, Mazdaspeed has a boss fitting on their website that you
may find useful, as it eliminates the warning light.
_________________
Date: Wed, 12 May 1999 08:46:41 -0700 I was wondering if anyone out there with a Momo Steering Wheel has either
looked into or own a MazdaSpeed hub adapter? It is supposed to alleviate
the airbag light blinking (without just yanking out the bulb) and perhaps
reactivate the horn. I got a price from CorkSport for $140. Seems high for
a hub (Momo charges $30-$50?) but normal for anything from MazdaSpeed.
_________________
Date: Wed, 12 May 1999 11:39:47 -0500 Got one, horn and airbag fooler works perfectly, looks factory, track
tested. Get one.
_________________
Date: Sun, 14 Feb 1999 22:30:27 -0500 (EST) I was just checking the Mazdaspeed web site and noticed they now offer a
steering wheel adapter for installing a MOMO or similar steering wheel
on a 3rd gen. It includes a connector or something that turns off the
flashing air bag light (and I believe stops the series of 5 beeps). The
air bag light flashes and a series of 5 beeps occurs when the air bag is
disconnected for those that didn't know.You can get around this by
removing the light and disconnecting the diagnostic module under the
dash but its a pain if you ever have to reconnect them.
Wonder if it allows the horn to work? I added a MOMO Tornado wheel but
still haven't figured out how to get the d@mn horn to work. I've gotten
the cruise to work but still no horn. Anyone have a gizmo to get the
horn to work. I know some list members have fabbed something to get
around this.
_________________
Date: Sun, 14 Feb 1999 22:02:56 -0600 The MazdaSpeed adaptor has a horn hookup.
_________________
Date: Tue, 6 Jun 2000 22:19:13 -0700 Don't forget to re-use the clock spring mechanism from the stock wheel. It
has the molex connector. Read the instruction on the yellow sticker re:
spring winding.
______________
Date: Wed, 07 Jun 2000 12:36:11 PDT Yes, place a 4 ohm resistor across the passenger airbag connector leads.
______________
The April '98 Car and Driver had an article on airbag removal
on pp. 131 - 133. It was by Patrick Bedard, and included
instructions by Eric Stork on getting the airbag warning light
to go off, along with removal instructions. (The light will
stay on all the time if the bags are removed.) Since Chris
and Rob have good instructions above, I will just include
the part on the warning light.
These instructions were for a '95 Mazda 626. I have not tried
them on an RX-7, but they should apply. On the 626, the computer
determines if the bags are disconnected via the lack of resistance
in the open circuit.
To determine the resistance, Eric used a potentiometer (pot).
He hooked the leads from each terminal of the pot to the airbag
connector on the wiring harness.
With the key on, he adjusted the pot until the warning light
went out. He then measured the value on the pot (I would assume
with an Ohm meter or multimeter). He then found a resistor
that would give the correct resistance, and wired it into place.
That took care of the light.
He said that just putting a wire across the airbag connector
may have worked, but he didn't try that. You may want to try
it before going to Radio Shack and buying the pot and resistors
(and the mulitmeter if you don't have one).
--Steve
_________________
Date: Tue, 21 Mar 2000 13:33:50 -0800 Air Bag System
Reference pages S-4, S-8 and S-9 of the Body Electrical Troubleshooting
Manual for details. The air bag system does a continuous "auto check" for
problems. If a problem is found, the "Air Bag" warning light will illuminate
continuously or flash. If the Air Bag warning light is burnt out, a warning
buzzer will sound when the ignition switch is first turned ON if there is a
malfunction with the system.
[Mail me]
[To Lightning home]
[To my home page]
[Copyright Notice]
From: Gene Felber
Sent: Wednesday, February 27, 2002 8:27 PM
Subject: Just Installed Momo Wheel and Mazdaspeed Hub
Airbag Removal / Warning Light
From: "John Levy" (mazdarx7@ziplink.net)
From: "Paul De Ruyter" (P.Deruyter@btinternet.com)
From: "Hedwig Poon" (hedwig.poon@encompass-tech.com)
From: "Brad.Barber" (Brad.Barber@alsformal.com)
From: tferragame@webtv.net (Terance Ferragame)
From: brad barber (bradrx7@swbell.net)
From: "Hedwig Poon" (hedwig.poon@encompass-tech.com)
>hi gang im in the process of installing my mazdaspeed d-cut steering wheel
>on my FD. Im using the mazdaspeed hub that doesnt include the air bag/horn
>connections. well i turned off the air bag light but i cant figure out how
>to hook up the horns. if i follow the horn wire back from the stock steering
>wheel i notice it connects to a blue connector that eventually terminates to
>a molex coneector under the dash. Sooo... i was wondering what could i do so
>i could use my stock horns with the mazdaspeed steering wheel???
From: "Mike Putnam" (mike_putnam@hotmail.com)
>I've just removed the passenger-side airbag in my 1995 rx7. The airbag
>warning light indicator keeps flashing red. Is there a way to disable the
>passenger airbag electronically
>or a way to trick the computer into thinking there is an
>airbag in the passenger side?
Air Bag Test Procedure
From: "Ulen, Robert S" (Robert.Ulen@PSS.Boeing.com)