
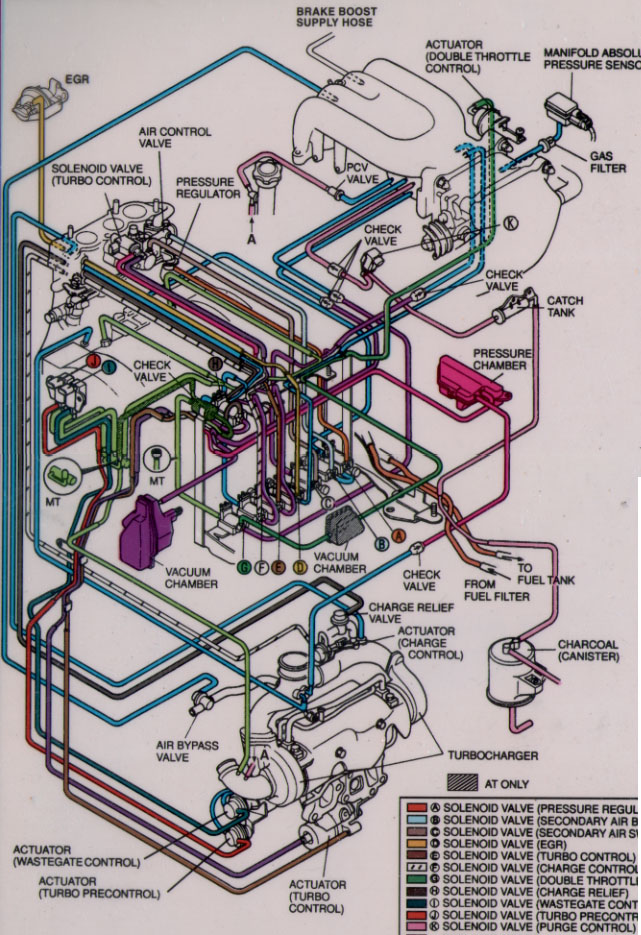

The following diagram shows the hoses that are pressurized:
_______________
From Bernd Kluesener:
ATTENTION owners of European spec FD's!!!
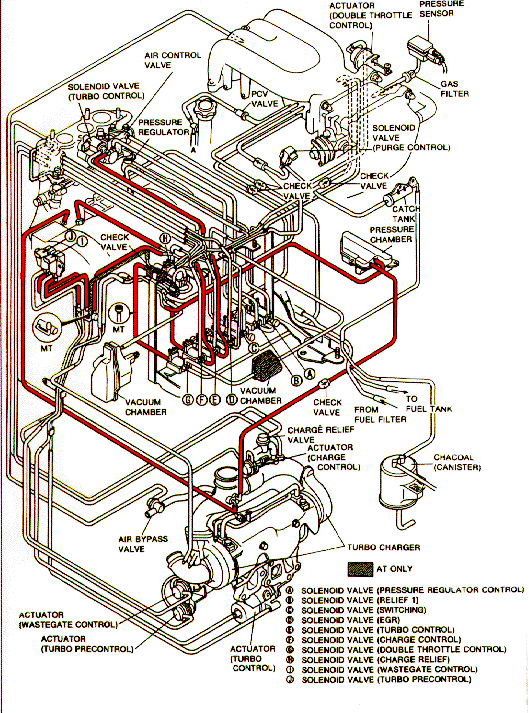
The Euro cars differ from the US and Australian models not only in the missing EGR valve - contrary to common belief. The relationship between fuel pressure and manifold pressure is controlled differently. So, ladies and gentlemen, when troubleshooting Your control system or when doing the famous vacuum hose job, make sure You reference the vacuum hose diagram from the European workshop manual - NOT THE ONES FOUND ON VARIOUS US WEBSITES (including Steve Cirian's excellent one).

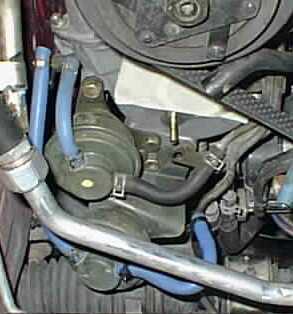
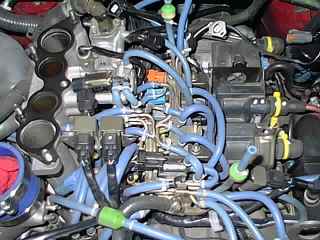
Picture of turbo controls with new solicone hose installed (courtesy of Spencer Hutchings):
Check out more info on how much hose you need, what type to get, where to get it, etc. --Steve
From: Boothcrafters@worldnet.att.net (David Booth)
Okay -- here's the last installment of the Great Vacuum Hose Replacement Adventure, subtitled Pitfalls In What Looks Like A Fun, Easy Project.
It's a lot tougher than it looks. It is a mistake to take this project lightly. Be prepared to have your car off the road for a while. Also, be prepared to do all the damn hoses, because the two that need replacing the most are also the most devlish to get at.
Make sure you have plenty of hose -- 30' of the 4mm for sure to do all the replacements in the engine bay.
Subassemblies that need to come off the car to do the whole job: intercooler intake pipe/throttle body/extension manifold; air control valve (on the intake manifold below the extension); air pump; alternator; ignition coils in their mounting tray; and the solenoid rack (have I discouraged you yet?).
The bad news: not removing the solenoid rack leaves four hoses inaccessible. They are:
On my car (a '94 with ~39k miles), these first two were rock-hard with
no elasticity left in them at all -- the first stage of Terminal Vacuum
Hose Disease. They are a must-replace item in this job.
The real trick in this whole process is removing the solenoid rack. It is held in place by four short phillips-head screws at the front and three at the back. They are also secured by a medium-strength Loctite-type material. You will only get one chance to get these screws out properly. If your screwdriver bit cams out of the screws and strips the heads you will be one unhappy camper. Use the proper size screwdriver and make sure that you're putting a lot of pressure DOWN on the screw head as you're turning in order to prevent cam-out or slipping. I used a regular screwdriver on the front four -- easy because the alternator was out. On the rear three, I used a 3/8" drive Phillips bit with a sparkplug ratchet, which allows the handle to gimbal around the drive head. This allowed me to get the bit straight in relation to the screw heads and angle the ratchet handle out from under the firewall. Here's the bad news: getting the rear screws back in is actually harder than getting them out.
Make sure that the short 180-degree runs of hose don't kink on you. Extra hose length is the solution here; and watch out for a low spot on the underside of the extension manifold that will pinch a poorly-routed vacuum hose shut when you re-install it.
Don't get ahead of yourself, do one hose at a time, and make sure you put everything back nice and snug. You'll be driving down the street grinning like a bandit, knowing you mastered the most diabolical system on the whole car.
_________________
Date: Sun, 17 Sep 2000 00:34:20 -0700
From: Max Cooper (max@maxcooper.com)
> I'm doing the big-nasty on my 95. I ran into a show stopper though, I can't
> get feasible access to the screws on the back side of the solenoid rack (the
> side that is next to the firewall). I tried all kinds of angles but only
> ended up semi-stripping one of the screws. (I think it will be ok if I can
> get a better angle on it)
It may be too late now, but the solution to that problem was described by Rob Robinette. Basically, you use a phillips "socket" on a ratchet. Using this method, you can hit the screws straight on, and it it much easier to both apply pressure and turn the screw than it is with a screwdriver.
But... you may have already stripped them too much for the easy method. I suggest now that you try to grab the screw head with a small pair of Vise-Grip pliers. Clamp them on and turn to break the screw loose. Once it is loose, you should be able to use a screwdriver or phillips socket to get them out the rest of the way.
I replaced several of these fasteners with little hex head screws ("bolts") to make it easier the next time if I ever had to do it again. I got little stainless screws with 8mm heads. I don't mean Allen heads, but just regular hex heads like your average bolt.
________________
Date: Sun, 17 Sep 2000 14:21:00 -0400 (EDT)
From: "Schwamb, Eric" (ESchwamb@Newport.com)
I had this same problem when I did the hose job. What I did was unbolt the rack from the top of the motor: If you look at the solenoid rack, the screws that you are trying to remove attach the rack to a bracket. This bracket attaches to the top of the motor with a few bolts (4 if I remember right). You can remove the solenoid rack by removing these bolts instead.
You will need to disconnect some fuel lines to do it this way, but it's pretty easy to do. Just make sure you clean up any fuel that leaks out afterward, as it can collect in little pools in a few spots. You probably don't want little pools of fuel on top of the motor when you finally start it up again. :)
Date: Sun, 26 Mar 2000 18:59:25 -0800
From: "Scott Hickerson" (netsuper@ca-connection.com)
>A couple of weeks ago, I took the plunge and performed
>the silicone vacuum hose upgrade on my '93 VR touring.
> During the job, I accidentally broke the solenoid
>valve that controls the EGR (the one in the middle of
>the rack).  I just plugged the vacuum line that leads
>to the manifold and put the car back together, knowing
>that the EGR wouldn't operate and that it would
>probably trip the engine light.  The car has run well
>since then (good boost, vacuum etc.), but today that
>changed.  I took the upper manifold off today to
>replace the EGR solenoid I had broken, and now that I
>have the car back together, it seems to run fine, but
>it makes this horrible noise.  The noise sounds
>exactly like a party horn! I took the manifold back
>off to check that everything was O.K., and I didn't
>see anything wrong.  Now that it is back together, I
>still have the same problem.  Is it possible that with
>the couple of weeks that the EGR has not been
>operating that it has frozen up, and now makes this
>noise when the computer tries to operate it?  I've
>never heard an EGR make a noise like this.  The noise
>only occurs above 2500 RPM or so, and seems to only
>happen at vacuum.  Under boost it seems to go away
>(although I haven't given it full boost yet).  I also
>don't hear it much abouve 3000 RPM (I have been
>hesitant to run it above 4000 RPM or so since it is
>making this noise).  The noise really seems to come
>from around the ACV, though it's hard to tell...any
>suggestions?  Do you think it is safe to drive?
It's probably your Air Regulator Valve (located UNDER the Intake manifold extension). There is a little disc bypass valve that can slip down when reassembling the ARV. I read about it on http://robrobinette.com/hoses.htm down the page from a lister CHRIS DAVIS (search for his name in the page or scroll down). This is more than likely your problem.
[Mail me] [To Lightning home] [To my home page] [Copyright Notice]